
 I love taking something old and out of date, or out of fashion and making something new out of it. I wish I had more time to play in my sewing room. It's so run to create new things. Refashion is a passion of mine! I have refashioned old clothes, sweatshirts and more. Recently, I came across a cute skirt on Etsy. I don't even remember what I was originally looking for! This skirt is adorable! I knew I wanted one for myself. This particular skirt wasn't my size. If you want to see the skirts she has for sale, click on the photo. I wrote to the seller to ask her if she sold directions. She was so sweet! She told me about the book that inspired her. I ordered it right away!! And, then I ordered another one for my granddaughter!
Rather than throw them away because they have a stain or a tear, why not take that old, used T Shirt and refashion it in to something brand new. Something wonderful!! Something totally fun!
I went through my old clothes and gathered anything that was made of T Shirt material. I started to see my T Shirts as a new fabric source.

Let me tell you. I have a lot of T Shirts that I don't wear anymore. I'm so glad that I didn't get rid of them!
I piled them on my sewing table and sorted by color.
 I chose three T Shirts to combine for my first, experimental skirt. I thought that these patterns would look great together. I love black. You can never go wrong with black. The T Shirt in the middle was never even worn. When I got it home, the pattern was just to big and too overwhelming for me. Now it's going to be perfect for my new skirt.
  After the T Shirts were chosen, I cut them open all the way on the sides.
  Next, I made a pattern piece. I used some heavy paper that I already had. I used the measurement from the book. I believe it was my waist, plus four inches, divided by six. I made the top of the pattern piece slightly smaller than the bottom to give the skirt some flare.
  I used weights whenever I can get away with not pinning. I simply laid my pattern piece on the fabric to my liking. I wanted to get as much of the design as I could, but I also hoped to have enough design for perhaps another piece or a pocket. That's why I didn't lay my pattern piece right in the middle.
 Cut it out.
  There you have it. My first pattern piece. Repeat six times.
 Side note. When I showed my finished skirt to my daughter, she thought it was too narrow for her taste. I agreed. My second pattern piece was much wider at the bottom. My third try was wider still. The third skirt with the wider bottom has the most "flare" and is my favorite!
 Next, take each pattern piece and pin them to each other. I did them one at a time. Pin two pieces together. Sew. Pin the then piece, LOOK AT IT before you sew. Make sure that it looks the way you want it. You can change the order of the pieces. I chose to alternate solid and prints.
 Here is my first skirt before I sewed the final pieces together. I was satisfied with the result.
  I used my serger for this project, but you can use a zigzag stitch on your sewing machine. The book even shows people how to hand sew their project. Side note. The serger I have is from Walmart. I have read lots of comments telling folks to avoid this machine. I disagree. It's really affordable (under $200). The better machines are a REAL investment. Walmart offers a 3 year warranty on the machine for only $20. For $200, you will have a serger for at least three years. That's worth it to me. It's complicated to thread, but after you've done it a few times, it's not so bad.
 I made the waist band from the bottom of a T Shirt. I just measured about four inches tall. For the width, take your actual waist measurement and add an inch. That should be fine.
I folded the piece in half longways and sewed it to the top of the skirt, right sides together.
I made my own little adjustment here that was not in the book. I snipped a little opening on the side and inserted a piece of elastic about half the size of my waist with a long piece of ribbon on each end. The ribbon hangs out of the opening and it tied in a bow. This gives me a very comfortable and adjustable waist band. And, the ribbon is a pretty touch.
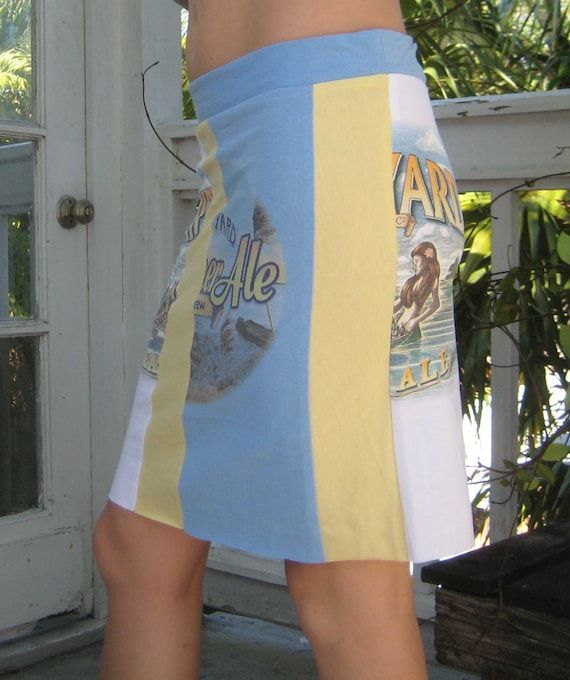
 Here is my finished skirt. Front.
  Back.
Back. Option. I thought it might be fun to add a pocket. As a photographer, I'm always wanting more pockets. Who wouldn't want extra pockets? They were easy to add and they come in very handy. I have plans for more pocket ideas in the future, so check back.
 Okay. Truth. After I piled all of those T Shirts on my table, I didn't actually "like" them. So, I went to the store to buy some cheap T Shirts for my next skirt. Guess what? I discovered that the larger size T Shirts have a LOT more fabric for the same price! I bought the largest sizes I could find. Woo Hoo!
I have made three skirts for myself and they are my FAVORITE thing to wear. So So Comfy! And cute! I get compliments on them every time!
here are all three.

I love my skirts so much! I wear them as is and I love to put on leggings if it's chilly.
On a recent visit to my son's house, I made a skirt for both my granddaughters and my daughter in law. Here they are modeling their skirts for you!


If you make a skirt, I would love to see it! Find me on Facebook, Twitter, Pinterest or Instagram and share your pic! If you like the skirt and don't want to make one, click on the first skirt above and you will find more skirts on Etsy....they are not made by me....but there are lots of choices!


