Showing posts with label tips. Show all posts

Monday, October 8, 2012

Maternity Tutu


I was looking at photography websites and I saw some beautiful pictures of pregnant ladies with amazing full length tutus.  Here is the website, her photos are amazing: http://loridorman.com/  I wanted to try to take a similar picture of my daughter and I thought I could make a tutu for her.  I procrastinated as usual and suddenly time was running out.  My daughter came over and helped me make the tutu and then she posed for the picture.  I went online and got some great ideas for making the tutu and here is what we did.

I chose these colors because I LOVE THEM and I knew that they would look good on my daughter.


I made a quick measure of how long I wanted it to be and then I just laid out the fabric and started cutting in to strips.


I found some ribbon in my stash that looked good with the fabric and I started to tie the strips on to the fabric.  It took a few tries to get all the knots to face the same way.  Also,


I was tempted to pull too tightly on the knots.  They are much prettier when they are loose.  I just tied the end of the ribbons to keep it in place.


And, here is the tutu!  Lovely! (if I may say so myself!)


And, here is my beautiful daughter (9 months pregnant) posing for me.  


By the way....this is my first photo since taking my photography class.  I got flustered with the camera controls....I have sooooo much to learn!


Isn't she pretty?  Still my princess.  Now...for the baby!


Saturday, March 10, 2012

St. Patrick's Day T Shirt Applique instructions

Just in time for St. Patrick's Day!  Show your GREEN with a simple shamrock applique on a regular T Shirt.  


Materials you will need:


a t shirt (I used black)
some green fabric
shamrock clip art printed out on paper 
scissors
green thread
green sequins
fray check


Step 1.  Print out some Shamrock shapes.  Download some shamrock shapes from the internet and print them in various sizes on regular paper.   (go to www.google.com, at the top of the page choose "images", next type in "shamrock clipart", enter.  You will have a variety of images to choose from.)


Step 2.  Cut the shamrocks out on paper to use as templates for tracing on to fabric.  I recommend that you pin the paper templates to your shirt while wearing it to see where the best placement will be. 


Step 3.  Choose your fabric. I looked at my stash of fabric and I chose this green satin/lining fabric.  It's shiny and festive and VERY green.  I used the paper template and traced the shapes on to the fabric with a black felt pen (magic marker- I used a medium point).


The tracing came through on the front as well, which is fine, because the tracing is not going to show, the trim will cover it up.


Step 4 Choose some trim.  I wanted my shamrock to be blinged out, so I looked in my stash of sequins and I found some green.    


Step 5  Cut out your fabric Shamrock.  Please notice that I did NOT trim to the very edge of the shamrock.  I intended to fold in under as I attached it so that it would not fray and also to give it a little bit of a puffy-ness.  This worked out great for me.  


Step 6 Fray check your fabric (if needed).  This green was sure to fray, so I applied Fray Check to the edges and let it dry before attaching it to my shirt.  You can see the dried fray check around the edges.  


Step 7 Sew on the Shamrock and sequins/trim.  Turn the edges of the shamrock under as you on the sequin/trim strip by hand, adjusting as you go.


Alternate idea: If you want to cut your shamrock to the edge, I recommend that you apply some iron on bonding to your applique and iron it on to the t shirt before applying your trim.  Either way would look great.  


Once it was done, I ironed it inside out to get out any wrinkles.


My t shirt is very stretchy, so it looks a little puckered when laying flat, but when I have it on, it looks smooth.  


Step 8 Enjoy your new shirt!


There you have it!  A very fun and festive and completely unique St. Patricks Day T Shirt, designed and created by YOU!  Please feel free to email me with any questions, I would be happy to help if I can.  steph@luluscottage.com


Monday, February 20, 2012

I chopped off my hair and nobody noticed!


Well, yes, I am being a little dramatic.  But, I did have a lot of my hair cut off.  And, nobody (hubby) noticed.
The longer it's gotten, the more attached I have become to it.  Why is that?  I decided to look up hair styling tips for women over 50.  The only people that they show on all of these articles is movie stars.  What about the rest of us? 


I just don't think that movie stars and regular women are on the same page.  We don't have hairstylists grooming us for photo shoots and making sure that every little hair is in place.  And, then having the resulting photo airbrushed to perfection.  What do those women have in common with the rest of us?

I have been in LOVE with fashion most of my life.  In the 80's and 90's I worked in the fashion business as an image consultant.  Remember when getting your "colors done" was the happening thing?  I did that.  Yes.  I told people their "season", what colors to wear and NOT wear.  And, I still love fashion.  Now, I'm way more relaxed.  I miss the glam and glitz of the 80's sometimes, but I enjoy the calmer styles that are current too.

That being said, I decided to give my own personal hair style tips for women over 50. 

1.  Please yourself.  You are over 50!  You don't have to conform to anyone else's idea of what you should look like.  If you are happy with the way you look, well, in my opinion "being happy" looks good on everyone!

Roux Tween Time Crayon
2. Gray hair, cover or don't cover?  If you have it and you color it, it seems to need constant maintenance.  Do it yourself or pay to have it done?  I've done it both ways and doing it myself is such a huge hassle!  I bought a box just recently and instead of using it, I broke down and went to my hairstylist.  So, here is my answer on gray hair.  For the most part I vote for coloring it.  Do it yourself or hire a pro?  I vote for the pro.  In between, I have a little crayon that covers gray temporarily.  It's easy to use and looks great.

3.  How long?  Again, it's your personal preference.  I have had pretty much every length (and color) for my hair in my life.  The last few years I have kept it long.  Sometimes I think it's my last hurrah before I get too old for long hair.  I guess I just like it.  (refer to rule #1) 


My best friend Connie fell in to the trap of letting her hairstylist choose her look.  I was with her one day when she had her hair appointment.  What I noticed is that each person the lady styled ended up looking the same, they all ended up with the same look that the hairstylist had for herself!  It was short and spikey.  My friend has a soft, romantic style, she loves the feminine things like pearls and lace.  This hairstyle was at odds with her as a person and I told her so (yes, I'm bossy, thank goodness she is patient and kind!).  She ended up changing stylists to someone who would listen to her and she let her hair get longer.  She says that she would not want hair as long as mine, it would be too much for her, and I agree (it's probably too much for me too!).  Here is what she has to say about her longer hair, "I have more choices of more styles.  I love my longer hair.   I feel like I have a spring in my step and I'm more vibrant.  Having longer hair makes me look and feel younger."

4. Color?   If you are going to color, what color should you choose?  I think the youngest color you can choose is something that is the closest to your natural color.  If you go for something that is drastically different than your natural, it can be harsh on your skin tone and features.  

5.  Care.  Take care of your hair.  You DO get what you pay for.  The products that you use on your hair are EVERYTHING!  If you choose the off the shelf, grocery store products, you will be missing out on some really spectacular results that quality hair products can give.  Another reason to have your hair done by a pro.  They know all the latest and greatest products.  


6.  Style.  Look at magazines and get fresh ideas for changing up your look.  Again, the pro hairstylist can give you new ideas.  Get together with your girlfriends and share ideas.  


Have fun with your hair.  You wear it everyday!  If you don't like your hairstyle, change it!  If you love your hairstyle....rejoice!


Sunday, February 19, 2012

I'm a BABY baby boomer


I'm a baby baby boomer

I keep hearing the term baby boomer and wondered "where do i fit in?". Am I a baby boomer? If so, what is it and how did it happen?

There are a couple of different date ranges for baby boomers, the most common one that I have seen is babies born between 1946 and 1959 (although there are also many that claim it to be 1946 and 1964). I was born in 1959, so either way, I qualify. I'm at the very end of the scale, a “baby” baby boomer.

What happened in 1946 to cause an increase in babies born? World War II ended. As the service men returned home and integrated in to society, they tended to get married and start families. That means lots and lots of babies.

And, ever since, those babies have been going through life as a huge population group. Because the new peacetime era was prosperous, these babies grew up in a time that was different than the generation before it. As the Boomers grew up, they changed society forever.

We Boomers have witnessed an enormous number of historical events in our lifetime. Cuban Missile Crisis, the assassination of President Kennedy (how many of us can still remember where we were when that happened?), we all watched on our television as the first man walked on the moon, the Vietnam war, women's liberation movement, and it goes on from there.

My personal view on being a boomer is that we all grew up in that time of innocence. Our parents were for the most part stereotypical parents, modeled after “Father Knows Best”. As the sixties and seventies began to change the definition of parents and families, we still had that vision in our minds. Are Boomers the generation that let those traditional views go by the wayside? I say yes. Unfortunately.

We are the first generation to experience the breakdown of the traditional family. When my parents divorced in 1970, I, personally, didn't know any other divorced people. There was a song, “Harper Valley PTA” that was all about a wild single mother. A woman to watch out for! A lot has changed since then. My mother had a job, but most of my friends mother's did not work. My dad wore a suit and tie to work and sometimes a hat. Things are so much more casual now.

As new tv shows and movies come along that depict that era, the differences between then and now are even more obvious. The way people behaved was more civil and careful. Manners were expected and so many things were just “not done”, “not said”.

Do you ever watch all the fun tv shows from the 60's? They were also innocent and simple. Far from the reality tv of today. I was watching “I Dream of Jeannie”, one of my all time favorites. I always wished I could just blink and make anything happen! I remember the side kick, Roger as being chubby. Have you seen him? He's tiny. Even the fat people back then were little. Everyone was LITTLE. We have really grown as a society since then.

Are boomers indulgent and self absorbed? We all grew up in a much more abundant time period. Our parents grew up in the depression and their experiences were all about not having enough. In my opinion, the Boomers are the exact opposite. We are the throw away society. We would rather get something new than fix something old.


The boomers gave the world Rock N Roll, a personal favorite of mine! We loved Elvis, the Beatles and of course there is Woodstock. We had transistor radios and could take our music on the go!


See if you remember these:

Phones: Everyone had the same one. In the sixties and seventies, you had literally two choices of color and we were all so excited to go from dial phones to push button. Before cordless, you were lucky to get a really, really long cord on your phone that you could walk around while talking.
Décor: Remember Harvest Gold and Avacado Green? Everything was one of those two colors. All appliances went from being just plain white to gold or green.


Television: We went from having one great big tv to having small ones in separate rooms. They all still had channel changers that “clicked” as you changed channels. We were all excited when Technicolor came along. And, all of our tvs had the extra knob for adjusting the vertical. Remember when you had to fiddle with it to get the picture just right?


Cars: I remember when my dad got a new Japanese car and all the dads in the neighborhood wanted to look at it. Before that we all had American cars. I think our new car was a Toyota Corolla. It was positively tiny compared to all the other cars.

And, while I'm on cars, do you remember when you had to actually “roll up” your window? Or “crack your window”, this was a little window called a “wing” that you could open to let in just a little air. Rolling up a window was no small task! And, of course NO air conditioning. Are you kidding? And we didn't have to wear seat belts. The seat belts were just the lap belts, nothing for the shoulder and no air bags of course! Most of us learned to drive on a stick shift and manual steering. Power steering....ah how nice that was!

Smoking. Well all the parents smoked. And they smoked a lot. Ashtrays were everywhere and were part of the décor. My mom had some beautiful ones. I always thought smoking was so pretty. My mother always manicured her nails and smoked like a lady. My dad was a rough “mans man” and he smoked cigarillo type cigarettes. There were always ashes. buts and smoke EVERYWHERE. No smoking section? I don't remember anything like that. Nobody ever talked about smoking being bad for you. My mother in law told me about an office that she worked in and they all smoked at work. She said it would get so smoky that you couldn't see across the room!

We played. Outside. Games. With each other. Yep. That's what we did. We did not have personal video games. We had friends. And neighbors. I remember many evenings that we would go outside and all the neighbor kids would play “kick the can”. As it started to get dark you could hear the parents calling kids to come and eat dinner. Dinner? Yes, that was something we all did with our families. We didn't think anything of it, this was everyone's normal life. We set the table every night and we all sat down together. After, our parents would go relax while us kids did the dishes. It was the same in every house that I knew.


Toys. We didn't have as many as kids have today. And, they sure seemed to last longer. I was a huge Barbie fan. I LOVED barbie. I wanted to BE barbie. My sister was too old to love Barbie, so she would “help” me build cardboard box mansions for my Barbie. I think it was her way of getting to “play” even though she was too old for such nonsense. My first Barbie was just like every other Barbie. Then they started to come our with newer ones, each with a new name and clothes. I remember when they got “bendy knees”, that was AMAZING! Ken was ok. Barbie needed someone to adore her. But, Barbie was the be all end all. My dad had a small sportscar, an MG Midget. I always felt just like Barbie in that car.

We Boomers have been a very lucky generation. We have had so many wonders, inventions, conveniences that have developed in our lifetimes. We have had the opportunities that generations before us did not have. And, we did many wonderful things, created things, built things. As we all move into the later stages of life, entire new industries are being created to care for us. There are Retirement Communities that are just for Boomers. 

It will be interesting to see how our society can handle the enormous impact that the aging of the boomers will have on everything, the economy, healthcare, etc.

If I could take the best of my memories of my “boomer” childhood and share them with the next generation, I would encourage them to honor marriage and family. The best thing a mother and father can for for their children is to love each other. And spend time together just being together. Not running from one event to the next. Family time can be just relaxing and talking. I would encourage them to bring civility back. My dad used to say “if you don't have something nice to say, don't say anything at all”, that's a good one. He also used to say “children are to be seen and not heard” and I didn't like that one at all! 

I would encourage people to refrain from the constant unfiltered talk in conversation and on the internet. Think before you speak. Speak as though the words you say actually matter. I would encourage people to slow down and think about what's really important in life. Is it the constant pursuit of possessions that matters the most? Or is it the people in your life that matter? Your faith, your family, your community?
I would encourage people to work hard and not expect a hand out. Better to give a hand up to those in need. I would encourage people to care about who they are and what they are becoming as an individual. To care about their appearance and their mannerisms. I would encourage people to care about the generation before them that gave them life and the generation that came after that they gave life to. We can all benefit from a little more innocence and traditionalism.


Tuesday, April 26, 2011

Eco/shopping bag instructions

I said a while back that I would put instructions here for the bag that I gave away on the One World One Heart tour.  Each time I write them, I get myself confused.  But here goes!


First the bag:


I made these for gifts and I wanted to use "eco friendly" as my theme.   I had this handy little shopping bag and it became my inspiration.


Here is it all folded out. 


So, I figured what is more eco friendly than using a bunch of fabric that I already have?  I looked through my stash and found this huge piece of fabric that I bought for a project that I never finished.  There was a LOT of it!


So, I just cut a couple of large pieces to get started.


The bottom was the fold, so I would only need to sew up the sides.


This fabric would look cool on either side.  I even ended up mixing the sides for variation.


On the top I just folded under, ironed it and sewed.  


I ended up folding under twice.  It looked better and seemed sturdier.


I sewed the sides up.  On the next few bags I ended up making french seams.  That made the bags pretty much reversible and sturdier.


So there is the basic bag.


I used the same fabric to make the straps.  You can make them any length you like.  I just made them the length of the fabric that was left over when I cut out the bag.


I made two strips about 2-3 inches wide.

Folded.


again


and ironed.


Then I sewed each strap.

 This is the outside pocket.  I just wanted something big enough to put a magazine or such in it.  


Some velcro to hold it closed.


This is where the inspiration piece came in handy.  There was a flap that made the bag stay rolled up small.


I sewed the soft side of the velco on the top of the outside pocket, and the sticky side on the inside of the flap.  That was so that the velcro on the outside of the bag would "catch" on everything.   Do the flap, but wait on the pocket so you can put it in just the right spot.


I sewed the flap on to the pocket before I sewed the pocket on to bag.  As I made more bags, I realized that the pocket should go on before I sewed up the sides....much easier. 

Then I sewed in the straps.  I folded the bag first to decide where I wanted the straps.


I made the little box with the x inside to make the handles sturdy.

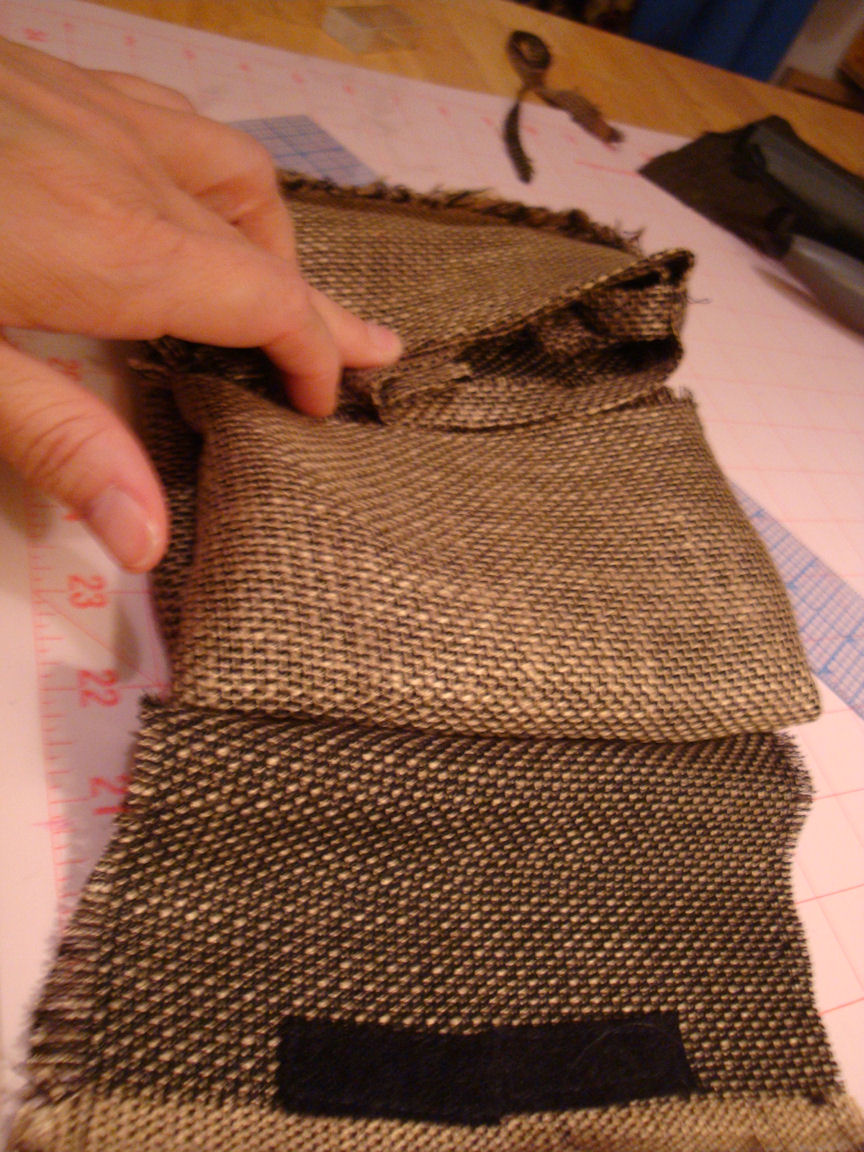
This fabric frayed very easily.  I decided to make that a feature in my design and I pulled all the threads around the pocket and the flap. 


Getting ready to fold it up and decide where the pocket velcro would need to be.  

Fold each side in.


And then fold the entire bag twice, so it's in thirds.

With the flap out.


fold it up.


That's where your matching velcro needs to be.
Sew it on and you are done!
Here is another one with the wrong and right side of the fabric mixed up.   I like the way it turned out. 


They are really cute if you fold them up with the handles out.  


Hope that works for you.